Store IP camera motion-detected videos in Dropbox using a Raspberry Pi

This is quick how-to explaining how to store videos from an IP camera into a remote storage service, each time motion is detected in the camera – in this case we will be using Dropbox.

Simcam IP cameras and Raspberry Pi

The default setup provides limited video quality but in my case this is fine since the cameras themselves keep a HD version of the recordings. I just wanted this to work as a remote backup in case any of the cameras are vandalised.

What do you need?

The same setup can be completed with similar components (e.g. you could use a USB camera instead). For illustrative purposes, these are the things I’ve used:

  • Hardware:
    • IP camera.
    • Raspberry Pi.
    • SD Card.
  • Software:
    • Any Debian-based distribution installed on the Raspberry Pi.
    • Motion.
    • Dropbox uploader.
  • 3rd party services:
    • Dropbox account

This guides assumes that the following setup is already completed:

  • Your IP camera has already been assigned a valid IP and/or rtsp address.
  • Your Raspberry Pi is up and running with either SSH access or console access through a video interface.

Installing and configuring Motion

Motion is a pretty interesting software that is able to process streams of video from different devices and allows triggering actions based on the motion detection, storing video on specific locations and streaming it.

First thing first, we will ensure the Operating System is updated:

sudo apt-get update && sudo apt-get upgrade -y

We are then ready to install Motion:

sudo apt-get install motion

Now it’s time to tweak the Motion configuration, to add the IP camera address, configure Motion to be started as a service and define the directory where the videos will be stored.

Let’s edit the /etc/motion/motion.confto modify the following settings.

Set the camera RTSP address:

netcam_url rtsp://username:password@camera_IP

Set the target directory where the videos will be stored:

target_dir /path/to/video/recordings

Enable Motion to be run as a daemon, insteado of running it manually:

daemon on

Allow camera stream to be used from other hosts (by default is restricted to localhost):

stream_localhost off

Allow web UI to be used from other hosts (by default is resitricted to localhost):

webcontrol_localhost off

Now we will edit the /etc/default/motion file to enable Motion to be run as a service by changing the following property:

start_motion_daemon=yes

You can now start the Motion service:

sudo service motion start

You should now be able to access the Motion web UI at http://raspberry_pi_address:8080

Installing and Configuring Dropbox Uploader

There isn’t an official Dropbox client that runs on the Raspberry hardware, but there is pretty decent alternative called Dropbox Uploader that allows uploading, downloading, deleting and listing Dropbox files. The only thing that does not seem to be supported is synchronisation.

Clone Dropbox Uploader into your preferred path by doing:

sudo apt-get install git git clone https://github.com/andreafabrizi/Dropbox-Uploader.git

Run Dropbox Uploader for the first time and you will be asked for your Dropbox API key. The script itself will give you instructions to obtain the key:

./dropbox_uploader.sh

Schedule automated upload of the videos to Dropbox and clean up

We will add 2 Cron jobs which will:

  • Upload the vídeos to Dropbox every minute.
  • Delete videos that are older than 7 days from the Raspberry Pi (credits to heiko)

Type:

sudo crontab -e

And add the following lines:

* * * * /path/to/dropbox_uploader/dropbox_uploader.sh upload /path/to/your/videos/* / >> /var/log/dropbox-uploader/dropbox-uploader.log
0 0 * * * /usr/bin/find /path/to/your/videos/* -name "*.*" -type f -mtime +7 -exec rm -f {} \;

I’m not scheduling the automated deletion from Dropbox since I want to check them manually first. Using the default video quality means that motion-detected videos of 20 seconds use only around 300 KB.
More information

Motion project

Dropbox Uploader

Raspberry Pi

How to fix a Dexter 3.6V electric screwdriver that does not rotate

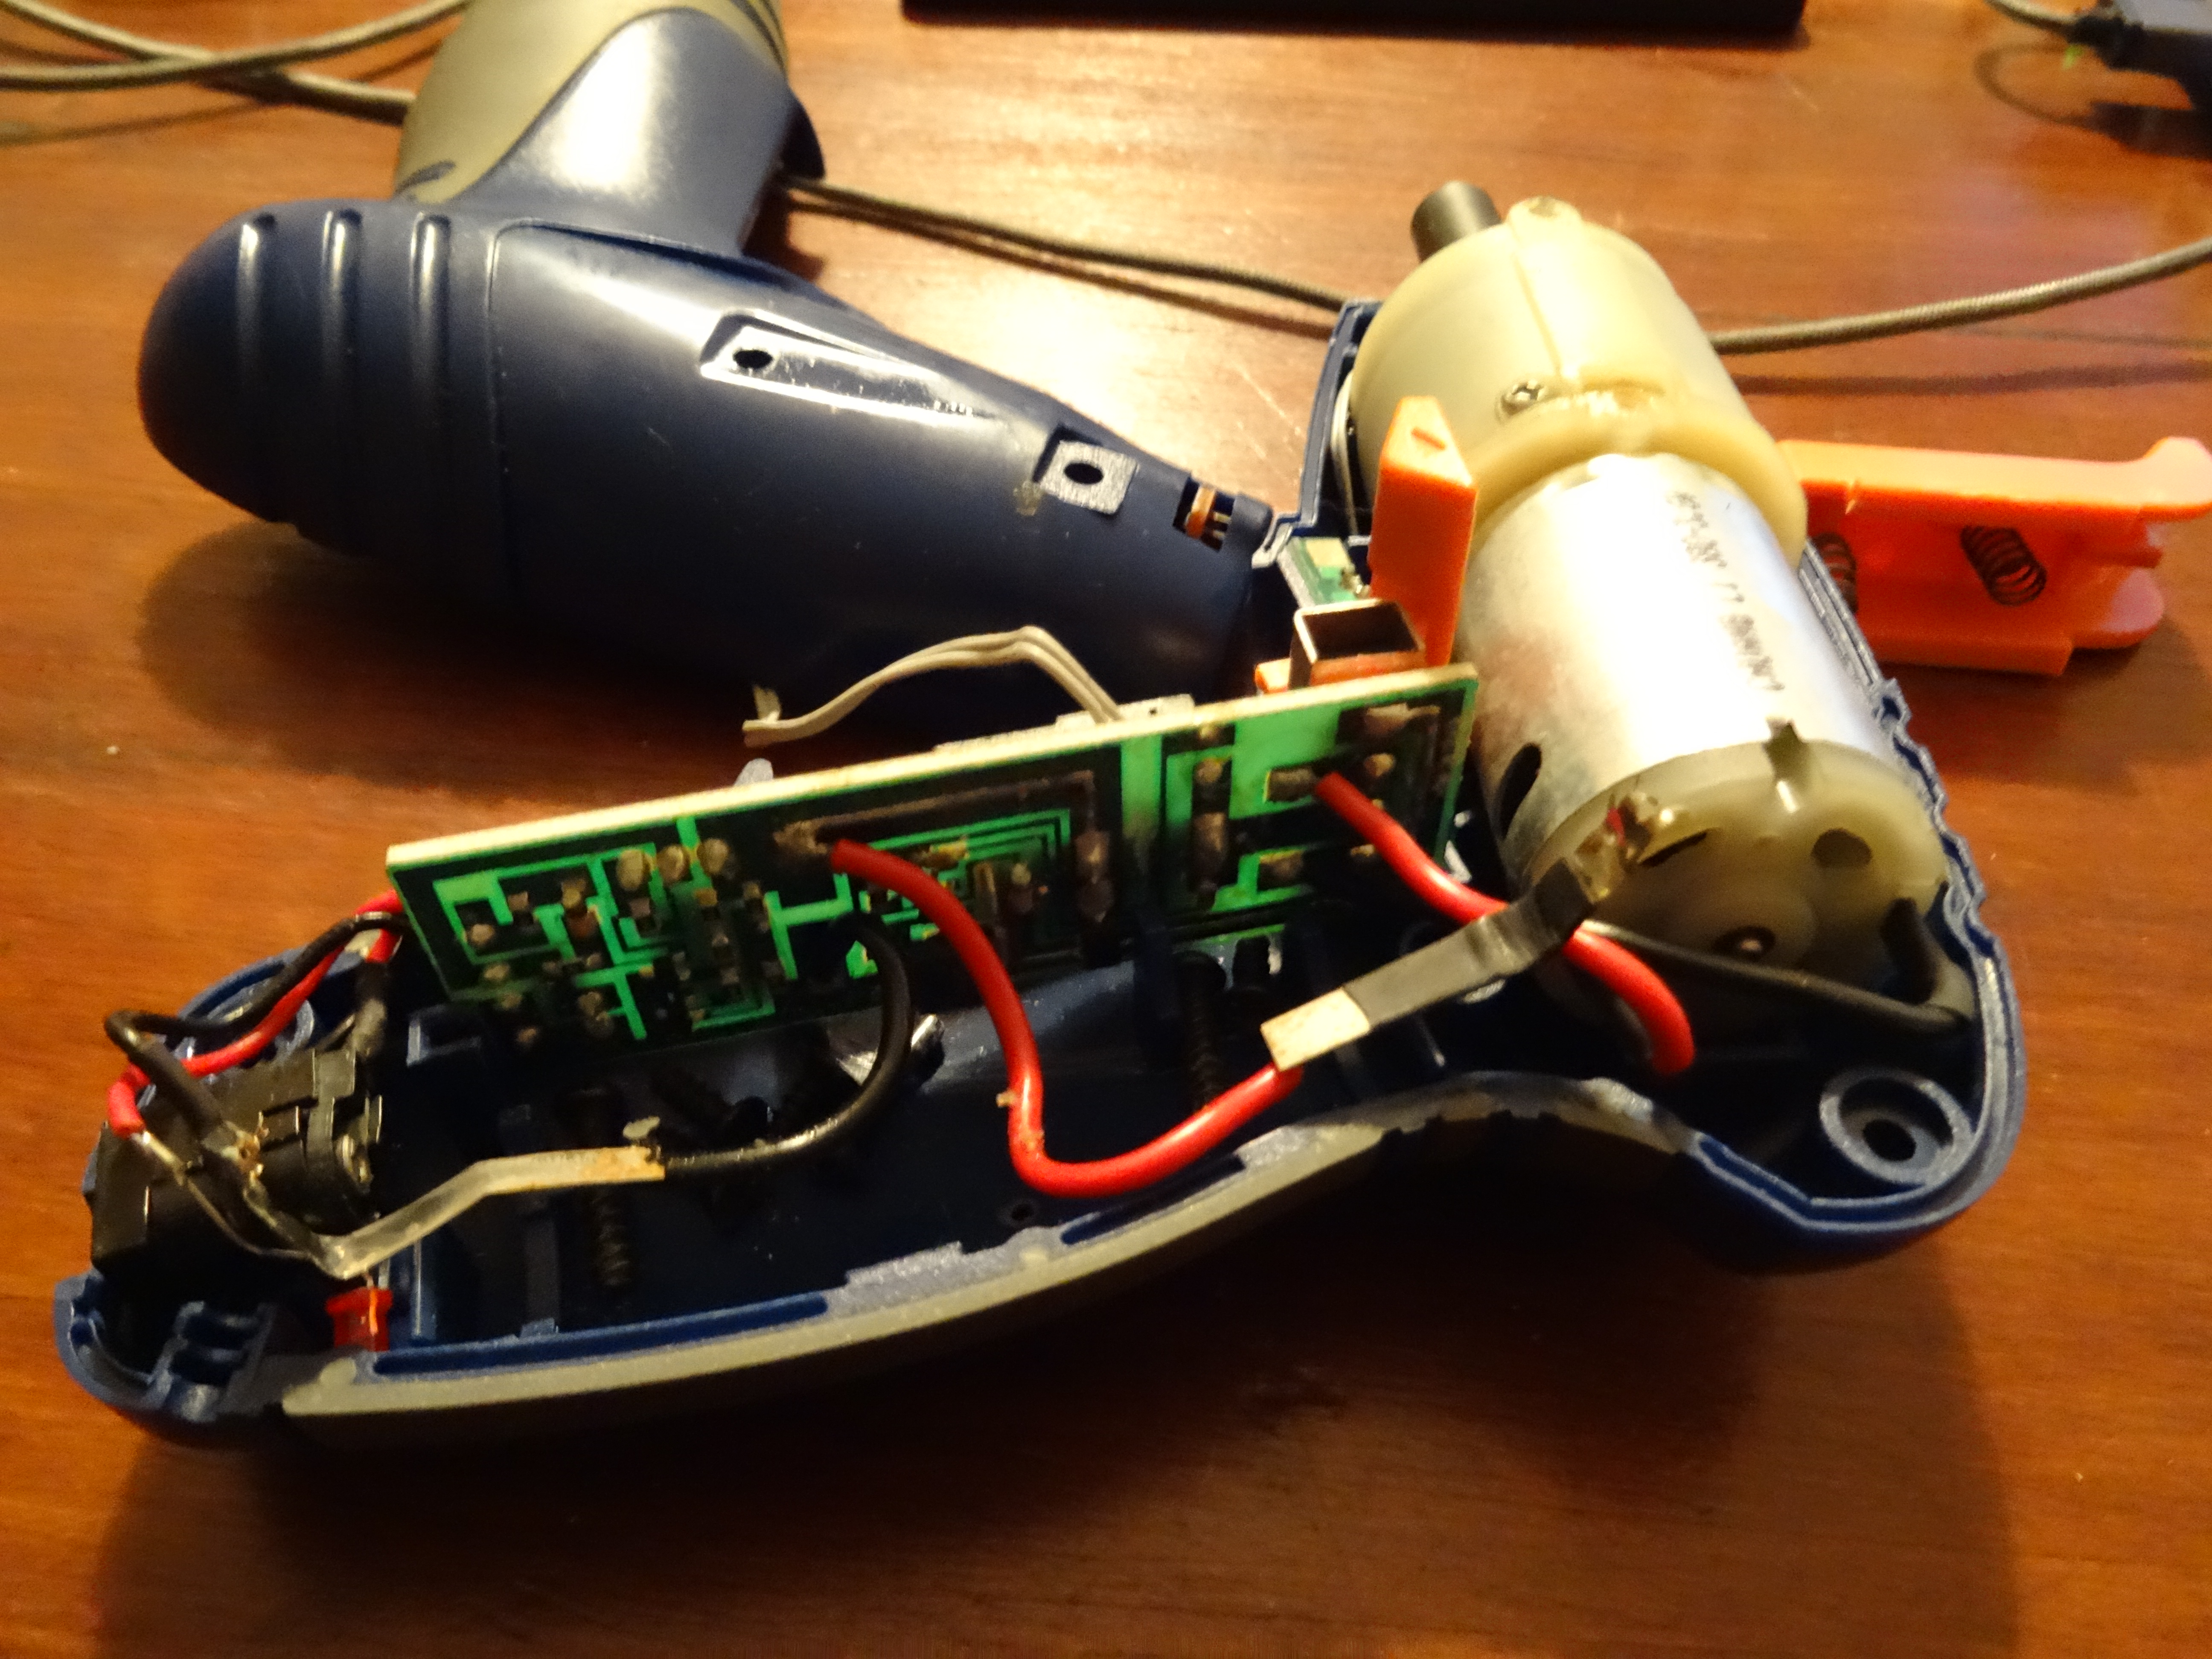
Few days ago I was working on my new wooden planters made with recycled pallets and when I was about to screw the sides I realized that the Dexter FC36LSD electronic screwdriver was not rotating. I left it charing all night but the day after it was still not working with the same issue: the light on but it would not rotate.

At home we are trying to adopt many zero waste practices and in general we are recycling and reusing as much as possible, so I decided to fix the screwdriver. My first guess was that the battery had stopped working. I disassembled the device in order to checked and indeed the 3.6V battery cell had only charged up to 0.573V.

Replacing the battery is pretty easy. You will need:

  • A new battery. I bought a lithium 18650 type from Amazon.
  • Star screwdriver.
  • Soldering iron.
  • Tin solder wire.
  • Sander.

First remove all the screws, including those under the stickers.

Then remove the cover.

Now carefully separate the 2 covers and remove the battery pulling the battery connectors.

Here we can see the battery does not reach the required tension once completely recharged.

If you are going to solder using a soldering iron, it is very important that you previously sand the chrome part of both poles. Otherwise the tin will not be soldered.

Now you can place the 2 bumpers that came with the old battery again.

¡Ready! We need to solder the battery and place the screwdriver covers, and it works again.


How to fix the side brush of the Roomba

As you know, I always recommend automatic cleaning robots, since I’m passionate about anything that automates repetitive tasks. We recently purchased a a Conga, with which we are very happy, but we also had an iRobot Roomba 520 for about 7 years, which I have been improving with some new components.

Since few weeks ago the side brush of the Roomba stopped working. And we have 2 wonderful felines, that during some periods of the year spread hair all over the house. These hairs are filtered through all the components of the Roomba and that is why it is very important to clean the device so often, thus ensuring correct operation.

After cleaning the hairs that were stuck on the side brush as I usually do, I noticed that it was not spinning because there was excessive clearance between the gears. If the same thing has happened to you, do not worry, solving it is very simple.

Unscrew the side brush and remove it. Then unscrew the remaining screws and lift the main cover.

Remove the 2 small screws from the side brush motor.

Now you can remove the side brush module.

Remove the main screw. I did not have a screwdriver of that type so I used a smaller plane to remove it.

It was time to prepare the piece that will help us solve the problem. Cut off the cap of a plastic bottle, so that only the flat surface remains, adjusted to the diameter of the gear.

Reassemble all the pieces and you’re done. I hope this helps you solve the problem with your Roomba.


Connect to a remote Xvfb server using VNC and a SSH tunnel

Xvfb is an in-memory display server commonly used to execute programs that require a UI in a server which does not have a screen output. Using Xvfb is very convenient when your automated tests are executed in a remote server and orchestrated by a Continuous Integration system.

While having a VNC server running in production instances is not always a great idea due to the potential security flaws, opening port 5900 on this server to allow external connections sounds even worse. This post will guide you through the steps required to access a remote VNC server via an SSH tunnel, without opening any additional ports.

Assuming that Xvfb is already running in your server and the display has been exported to :99, the next step is to install x11vnc:

sudo yum install -y x11vnc

IMPORTANT: Connections to remote x11vnc servers are not password protected by default which leaves your server accessible to potential attackers. Make sure x11vcn is always started with the argument ‘-rfbauth ‘.

We will now establish the tunnel to access the x11vnc server through SSH. This needs to be done in your workstation:

ssh -i [SSH key] -l [username] -L 5900:localhost:5900 [server hostname] ‘x11vnc -display :99 -localhost -rfbauth [VNC server password file]’

You are now ready to access your remote server screen by using a VNC client in your workstation and connecting to localhost:5900

Install LineageOS on top of CyanogenMod ROM

lineageos

This post will guide you through the installation of LineageOS on top of CyanogenMod. While data could be preserved during the upgrade using the EXPERIMENTAL releases, this did not work for my OnePlus One so I had to go for the full upgrade and then use the Google Backup to restore my data.

DISCLAIMER: This is an experimental process and might damage your phone or affect the integrity of your data. It is always a good idea to use backups.

Required downloads

Installing TWRP

The instructions below work on Windows.

1. Open a command line and navigate to the directory where you have downloaded the SDK Platform Tools.

2. Disable the CM Recovery protection in Settings > Developer Options > CM Recovery option.

3. Put your device into bootlader mode – If this isthe first time you are using the SDK, you will probably need to accept the connection in your phone:

    adb reboot bootloader

4. Unlock the boot – this will wipe all your data!

    fastboot oem unlock

5. When the welcome screen appears, reboot your devide and enter into bootloader mode by pressing volume down + power buttons for 10 seconds. Once the recovery menu appears select the option to boot from bootloader.

6. Flash the TWRP image:

    fastboot flash recovery twrp-3.0.x.x-xxx.img

5. Wait until the flash process is completed and then reboot your device:

    fastboot reboot

Flashing LineageOS release

6. Shut down your device and boot it in TWRP recovery by pressing the volume down + power buttons until the logo appears.

7. Copy the LineageOS images to your phone.

8. Select ‘Install’ in your phone and select the LineageOS image.

9. Swipe to confirm Flash.

Install Gapps

10. Copy the Gapps package to your phone.

11. Select ‘Install’ in your phone and select the Gapps package.

12. Enable the checkbox to reboot your device after the installation is complete.

13. Swipe to confirm Flash.

That should be it. If you have any question, feel free to ask on the comments.

Install CentOS in your HP MediaSmart EX470

hp mediamart ex470I have been using the HP MediaSmart EX470 home server for few years and it was quite a nice experience. Unfortunately HP decided to stop supporting these devices which means not getting any updates or fixes. I then decided it may be a good time to park the built-in Windows Home Server and switch to CentOS. I have chosen this Linux distribution because this is the one I’m most used to (it’s extensively used in corporate environments). Ubuntu could also serve this purpose but I still preferred CentOS since it comes with the minimum basic packages and allows you to keep growing it per your needs instead of shipping lot of features you don’t really need.

You will need:

  • VGA cable for the MediaSmart devices. These servers do not come with a built-in video port, so you will need to install one (you can either build it yourself or buy it from eBay).
  • Physical keyboard.
  • USB storage device.

The installation is pretty simple, although there are few tricky steps to take into account:

  1. Backup all the data you want to keep from the installed hard disks (the process will delete it!)
  2. Shut down your server.
  3. Connect the USB storage device where you have copied the CentOS installation files to the BOTTOM USB IN THE REAR PART. This is the only USB port that will work when booting up from an external disk.
  4. Connect the keyboard to any other USB port.
  5. Turn on the server.
  6. Press the DEL key to enter the BIOS and disable the option to suppress the boot selection. It’s located under the Advanced BIOS settings.
  7. Save the BIOS settings and when system boots up again press F12 to select the boot device.
  8. Chose the option ‘USB-CDROM’.
  9. Install CentOS normally.

Bonus pack, if you want to have a GUI. You will need to install the VGA drivers manually:

Enable the Ethernet connection (remember CentOS has it disabled by default):

ifup eth

You probably want to also have your ethernet connection enabled automatically when booting up:

vim /etc/sysconfig/network-scripts/ifcfg-eth0

Change the line:

ONBOOT=no

to

ONBOOT=yes

You can skip the 2 next steps if you are using an HP MediaSmart EX470, but I have listed them in case they help people with other systems.

Install pciutils in order to have the lspci command and list which VGA driver you need:

yum -y install pciutils

Check your VGA device:

lspci | grep VGA

Install the VESA drivers for XORG:

 yum -y install xorg-x11-drv-vesa

Install the evdev drivers for the mouse and keyboard to work properly with XORG:

yum -y install xorg-x11-drv-evdev

You are ready to go. Just type ‘startx’ on the command line and you should be able to enjoy the GUI.


Migrating users and posts from Drupal to WordPress

Few weeks ago I decided it was time to change the look and feel of Santako.com and also take the opportunity to start using a content management system that simplifies the administration. It didn’t take us very long to chose WordPress due to its versatility, high quantity of plugins available and the little maintenance required.

One of the first challenges has been to migrate the users and articles from the current version, which uses Drupal. I haven’t found any plugin that executes the migration automatically so I decided to export the data in CSV tolater import it in WordPress. The steps I’m explaining bellow were executed with Drupal 7 and WordPress 3.6. In my case, I just needed to import some basic elements from the posts, so many fields such as the author, dates and tags were not migrated.

Users

  • Access the Drupal installation database from phpMyadmin.
  • Select the ‘users’ table.
  • Click on ‘Export’ and select ‘CSV’ as file format.
  • Once the file is generated, edit it and add the following headers in the first line, linking these to the columns (you can delete the rest of columns):
    • user_login
    • user_pass
    • user_email
  • Install this plugin in WordPress and enable it:  http://wordpress.org/plugins/import-users-from-csv/
  • Access the ‘Users’ menu and select ‘Import from CSV’.
  • Click on ‘Import’.

Posts

  • Access the Drupal installation database from phpMyadmin.
  • Click on the ‘SQL’ tab.
  • Paste the following query and click on Go’:
 SELECT *
 FROM node
 INNER JOIN field_revision_body
 ON node.nid=field_revision_body.entity_id;
  • Install this plugin in WordPress and enable it: http://wordpress.org/plugins/wp-all-import/
  • Access the plugin from the administration sidebar.
  • Select ‘Upload File From Your Computer’  and click on ‘Next’.
  • In the following steps you will be asked to drag and drop the imported data to the fielsd they belong to and confirm some default options.

Once the import is complete, I recommend using the plugin Broken Link Checker  to make sure everything worked properly and there are no broken links.

Dos meses sin Internet gracias a Yacom

router yacomSolicité el alta del servicio de ADSL con Yacom el día 12 de junio y a día de  hoy todavía no tenemos conexión (sí, hace ya más de 2 meses). Desde entonces un gran cúmulo de despropositos han ido sucediendose en lo que yo calificaría como el peor servicio de atención al cliente de este pais. Y todos sabemos que hay una notable competencia; de mal servicio y poco respeto a los derechos del consumidor, no de proveedores de Internet.

Desde el primer día, el técnico de Movistar nos dijo tanto al técnico de Yacom como a mi, que en la central no llega señal de Yacom, pero esa no ha sido suficiente explicación para que nos hagan perder el tiempo y la paciencia de manera reiterada una y otra vez.

  • Nos han citado en 7 ocasiones para revisar la instalación del domicilio (aun sabiendo que la señal no llega a la central). De estas citaciones, para “pruebas conjuntas”, en 4 ocasiones el técnico no ha aparecido por casa (supongo que aprovechó para irse a desayunar) y en algunas de ellas ha comunicado en la incidencia que me nos había notificado que no iba a venir (mentira!!!).
  • He intentado abrir una reclamación decenas de veces. Algunos agentes me han asegurado que me han abierto la reclamación y al volver a llamar otros me indican que no hay ninguna reclamación. Otros agentes simplemente me han indicado que me pasaban con el departamento de reclamaciones y me desvían al soporte técnico.
  • He enviado tres correos a acceso@ya.com con mi reclamación, que nunca han respondido, aunque en mi incidencia indican que sí lo han hecho.
  • He hablado con todos los departamentos que se mencionan al iniciar la llamada y decenas de veces me han indicado cosas como que: mi situación es una vergüenza y es inadmisible y que ahora mismo el agente se levantaba de su sitio para comunicarlo en persona a sus superiores, y que me iban a llamar en unas horas para explicarme el motivo de tal caos. Nunca me han llamado (y la primera promesa ya fue hace tres semanas).
  • Todos los agentes se niegan a pasarme con un coordinador del área.

Llevo ya unas poquitas incidencias y otras cuantas revisiones de mil tonterias, mientras que Yacom se niega a ir a la central a revisar el problema y Movistar se lava las manos. Supongo que el tema va de que las empresas subcontratadas que tienen cobran por cada visita realizada o simplemente los trabajadores están tan poco satisfechos con su trabajo que lo hacen todo lo mal que pueden.

La única solución que me ha dado Yacom es invitarnos a darnos de baja sin que nos pongan ninguna pega (¡wow! todo un lujo…), dado el mal servicio que estamos recibiendo. Así que después de dos meses sin Internet, hemos decidido hacerles caso. En esta ocasión he enviado una denuncia a la Agencia Catalana de Consumo de la Generalitat. A diferencia de la reclamación, que es el instrumento que suelo utilizar para pedir compensación o subsanación de daños, la denuncia sirve para poner en conocimiento de la Administración hechos que puedan constituir infracciones administrativas y defender los derechos generales.

Lo peor de todo esto no es que existe una avería que no se soluciona desde hace tanto tiempo, sino que un cliente pueda tener una incidencia abierta durante mas de 2 meses por corte de servicio y en Yacom nadie sepa ni cuál es el estado de la incidencia, ni si alguien se está haciendo cargo ni qué es lo que sucede exactamente. Intento imaginarme los motivos de esta situación y lo único que me viene a la cabeza es una serie de departamentos sin ganas de trabajar pasándose la pelota y unos responsables de área tremendamente saturados por estas situaciones o siempre pasivos sin ganas de actuar.

Y como toda buena historia, ahí van mis 3 lecciones aprendidas que comparto con vosotros a modo de sugerencias:

  • Si te atiende un operador que no escucha tu problema, no es resolutivo o simplemente te miente, no pierdas el tiempo, cuelga la llamada educadamente y vuelve a llamar para hablar con otro operador. Cuando recibas la llamada para valorar la calidad de la atención recibida, expresa tu opinión valorando la experiencia.
  • Si consideras que se vulneran tus derechos, reclama. Quejarte en un foro o contándoselo a un amigo no cambia las cosas. Haz uso de los mecánismos oficiales y si necesitas información empieza por acudir a la Oficina Municipal de Información al Ciudadano.
  • Nunca contratéis ningún servicio con Yacom.